Spring
자바 어플리케이션 개발 프레임워크
주요 개념
- 경량 컨테이너
- DI (Dependency Injection)
- AOP(Aspect Oriented Programming)
DI (Dependency Injection)
- 강한 의존 관계를 줄이는 개념
- 유지보수에 용이하도록 만들 수 있음 (수정에 대한 요청에 유연하게 대처 가능)
- 클래스 간의 의존 관계를 스프링이 알아서 해줌
- 직접 객체 선언 X (객체를 스프링이 제공해주는 환경설정에서 설정)
- 만약 어떤 객체가 바뀌면 스프링 환경설정 에서만 바꾸면 된다
강한 의존 관계
- 객체를 직접 선언할 경우 강한 의존 관계에 있다고 볼 수 있음
- 이럴 경우에 객체가 바뀌게 되면 일일이 찾아다니면서 바꿔야 해서 유지보수의 어려움이 있음
- 그래서 '느슨한 의존 관계'로 만들어야 한다
느슨한 의존 관계로 만들기
- 클래스로 만들지 않고 인터페이스로 만들면 조금은 느슨해 진다.
그러나 여전히 구현한 클래스로 일일이 고쳐야한다. - 그래서 최종적으로는 Spring 설정파일(xml)에서 객체를 생성 하도록 하여 해당 설정파일만 바꾸도록 설정해야 한다.
스프링 객체 생성 방법
1. XML 기반 (옛날 방식)
2. 어노테이션 기반 (요즘 방식)
1. XML 기반의 객체 생성 (환경설정)
- 스프링 설정파일을 이용한 객체 생성
xml 설정파일
<bean id ="사용 할 id" class="제공 할 클래스명" />
<bean id ="m" class="exam03.MessageBeanEn" />- 생성된 객체 사용하기 1 (BeanFactory)
- 최상위 클래스로 Resource가 필요하다
Main
Resource resource = new FileSystemResource("설정 파일 명.xml");
BeanFactory factory = new XmlBeanFactory(resource);
인터페이스명 m = ("인터페이스로 형변환")factory.getBean("설정한 객체명");
설정한 객체명.호출할 함수("");
		Resource resource = new FileSystemResource("beans.xml");
		BeanFactory factory = new XmlBeanFactory(resource);
		MessageBean m =  (MessageBean)factory.getBean("m");
		m.sayHello("tiger");
- 생성된 객체 사용하기 2 (ApplicationContext)
- BeanFactory를 상속받은 클래스
- Resource가 필요 없음
- classPath를 기준으로 xml의 위치를 표현 가능
ApplicationContext ac = new ClassPathXmlApplicationContext("패키지명/설정파일.xml");
		ApplicationContext ac = new ClassPathXmlApplicationContext("diTest04/beans01");
		Person p = (Person)ac.getBean("p");
		p.info();
속성 의존관계 설정 방법
생성자에 의해서 설정 할 때 - <constructor-arg>
setter에 의해서 설정 할 때 - <property>
1. 생성자의 의해서 초기화 할 때
<constructor-arg value ="값"/>
	<bean id="d" class="exam02.Dept">
		<constructor-arg value="1"></constructor-arg>
		<constructor-arg value="개발"></constructor-arg>
		<constructor-arg value="판교"></constructor-arg>
	</bean>
1.1 A클래스에서 B클래스 타입의 멤버 변수가 선언될 때 (ref 사용)
- B클래스 타입의 객체를 먼저 생성 해주고, A클래스에서 ref를 사용해 참조 객체인 B를 받아야함
	<bean id="p" class="exam03.Person">
		<constructor-arg value="이순신"/>
		<constructor-arg value="30"/>
	</bean>

	<bean id="dao" class="exam03.PersonDAO">
		<constructor-arg ref="p"/>
		<constructor-arg value="2022"/>
	</bean>
2. Setter에 의해서 초기화 할 때 (property 사용)
<property name="변수명" value="값"/>
<property name="변수명" ref="참조 할 객체명"/>
	<bean id="p" class="exam04.Person">
		<property name="name" value="이순신"></property>
		<property name="age" value="209"></property>
	</bean>

	<bean id="dao" class="exam04.PersonDAO">
		<property name ="person" ref="p"></property>
		<property name ="year" value="2021"></property>
	</bean>
의존관계 자동 설정
1. byName
autowire="byName"
- 멤버변수의 이름과 동일한게 존재하면 자동으로 의존관계 설정

2. byType
autowire="byType"
- 멤버의 자료형과 똑같은 객체의 자료형이 있으면 자동으로 의존관계 설정
- 해당 타입은 유니크해야함
3. constructor
autowire="constructor"
- 생성자에 의한 의존 관계 자동 설정
- 내부적으로는 byType으로 설정 되므로 동일 객체가 유니크 해야함
Bean 범위 설정
singtone - 하나의 Bean 정의에 대해 하나의 객체만 존재 (기본 값)
prototype - 하나의 Bean 정의에 대해 다수킈 객체가 존재 가능
request - 하나의 Bean 정의에 대하 HTTP Request 생명주기 안에서는 단 하나의 객체만 존재
session - 하나의 Bean 정의에 대해 하나의 HTTP Session 생명주기 안에서는 단 하나의 객체만 존재
global session - 하나의 빈 정의에 대해 하나의 global HTTP Session 생명주기 안에 단 하나의 객체만 존재
scope =
"singleton" - (기본 값), 객체를 1개만 만들어 놓고 다 같이 사용 한다.
"prototype" - 요청할 때마다 다른 객체로 사용
"request"
"session"
등등
1. singleton
- scope="singleton" (기본), 객체를 1개만 만들어 놓고 다 같이 사용 한다.
- 하나의 Bean 정의에 대해 하나의 객체만 존재
singleton 설정
- kim1/kim2는 같은 객체를 공유 (주소 값 동일)
- 당연히 생성자도 1번만 실행 됨
	<bean id="kim" class="exam01.Person" scope="singleton">
		<property name="name" value="김유신"></property>
		<property name="age" value="20"></property>
	</bean>
Person kim1 = (Person)context.getBean("kim");
Person kim2 = (Person)context.getBean("kim");
2. prototype
- 하나의 Bean 정의에 대해 다수킈 객체가 존재 가능
<bean id="kim" class="exam01.Person" scope="prototype">prototype 설정
- kim1/kim2는 각각 다른 객체임 (주소 값 다름)
- 당연히 생성자도 각각 실행 됨

3. request
- 하나의 Bean 정의에 대하 HTTP Request 생명주기 안에서는 단 하나의 객체만 존재
4. session
- 하나의 Bean 정의에 대해 하나의 HTTP Session 생명주기 안에서는 단 하나의 객체만 존재
5. global session
- 하나의 빈 정의에 대해 하나의 global HTTP Session 생명주기 안에 단 하나의 객체만 존재
2. 어노테이션(@) 기반의 객체 생성
- 자바 클래스를 이용
- @Bean 어노테이션 사용
설정용 .class 파일
@Configuration -> 환경 설정의 의미
public class 클래스이름{
@Bean
public 생성할클래스 id입력()
{
return new 생성할클래스();
}
}
------------- 같은 의미 ------------------
<bean id="id입력" class="생성할클래스">
main 파일
ApplicationContext context = new AnnotationConfigApplicationContext (클래스이름);
		ApplicationContext context
		 = new AnnotationConfigApplicationContext(클래스명 입력);
Spring MVC
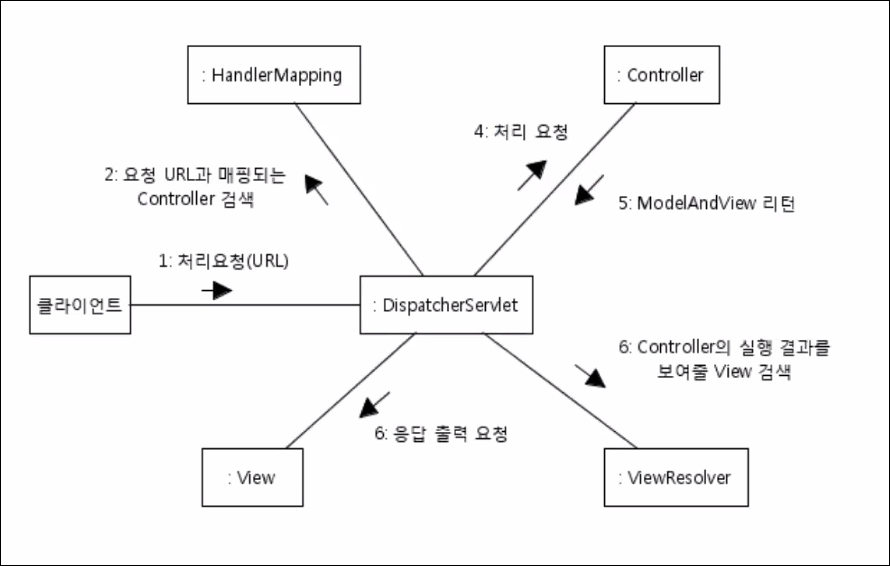
스프링 MVC의 구성요소
DispatcherServlet
- 클라이언트의 모든 요청을 전달 받음
- 모든 요청을 컨트롤러에게 전달하고 해당 컨트롤러가 리턴한 결과 값을 View에게 전달하여 알맞은 응답을 생성
- servlet-name 과 동일한 이름의 xml파일이 필요 ( 아래의 경우 cclee-servlet.xml )
web.xml에 설정
  <servlet>
  	<servlet-name>cclee</servlet-name>
  	<servlet-class>org.springframework.web.servlet.DispatcherServlet</servlet-class>
  </servlet>
HandlerMapping
- 클라이언트의 요청 URL을 어떤 컨트롤러가 처리할 지를 결정
- @RequestMapping("서비스명.do")
- servlet-name 과 동일한 이름의 xml파일이 필요 ( 아래의 경우 cclee-servlet.xml)
web.xml에 설정
  <servlet-mapping>
  	<servlet-name>cclee</servlet-name>
  	<url-pattern>*.do</url-pattern>
  </servlet-mapping>
@Controller
public class ...controller {
@RequestMapping("/xxx.do")
public ModelAndView xxxx() {
.....
.....
.....
}
}
컨트롤러(Controller)
- 클라이언트 요청 처리 후 DispatcherServlet에게 알려줌
- @Controller 로 선언
@Controller
public class HelloController {
	...
	...
}
ModelAndView
- 컨트롤러가 처리한 결과 정보 및 뷰 선택에 필요한 정보를 담는다.
@Controller
public class ...controller {

	@RequestMapping("/xxx.do")
	public ModelAndView xxxx() {

		ModelAndView mav = new ModelAndView();
		mav.addObject("msg", "Hello SpringMVC");
		mav.setViewName("hello");
		return mav;
	}
}
ViewResolver
- 컨트롤러의 처리 결과를 생성할 뷰를 결정
- web-inf 폴더 밑에 View를 생성되는게 좋음 (webapp은 노출 위험 존재)
- View명만 입력하면 폴더와 확장자를 설정해줌
- 꼭 객체명은 viewResolver 로 해야함
<bean id="viewResolver"
class="org.springframework.web.servlet.view.InternalResourceViewResolver">
	<property name="prefix" value="/WEB-INF/views"></property>
	<property name="suffix" value=".jsp"></property>
</bean>
위 처럼 설정해두면 컨트롤러에서 뷰 이름으로만 아래처럼 사용 가능
/WEB-INF/views/hello.jsp의 의미
setViewName("hello");
View
- 컨트롤러의 처리 결과를 화면에 생성
스프링 MVC 동작 원리
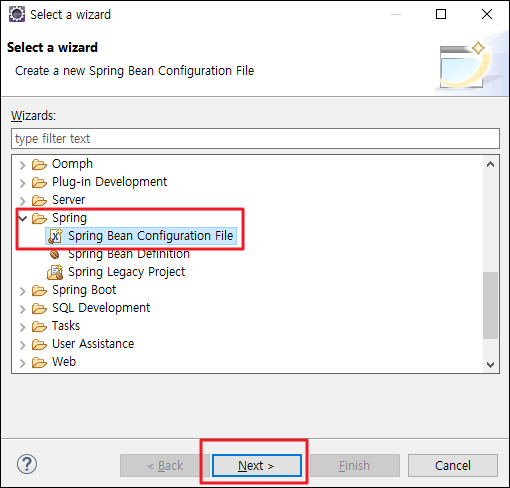
bean 설정파일 만들기 (.xml)
Wizard - Spring - Spring Bean Configuration File
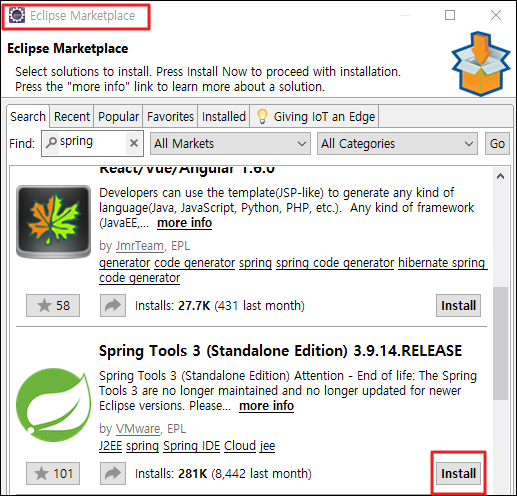
이클립스에서 스프링 플러그인 설치
1. Help - Eclipse Marketplace - Spring 검색하여 설치
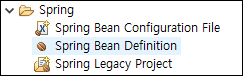
2. 프로젝트 생성 시 아래와 같이 Spring이 있으면 성공
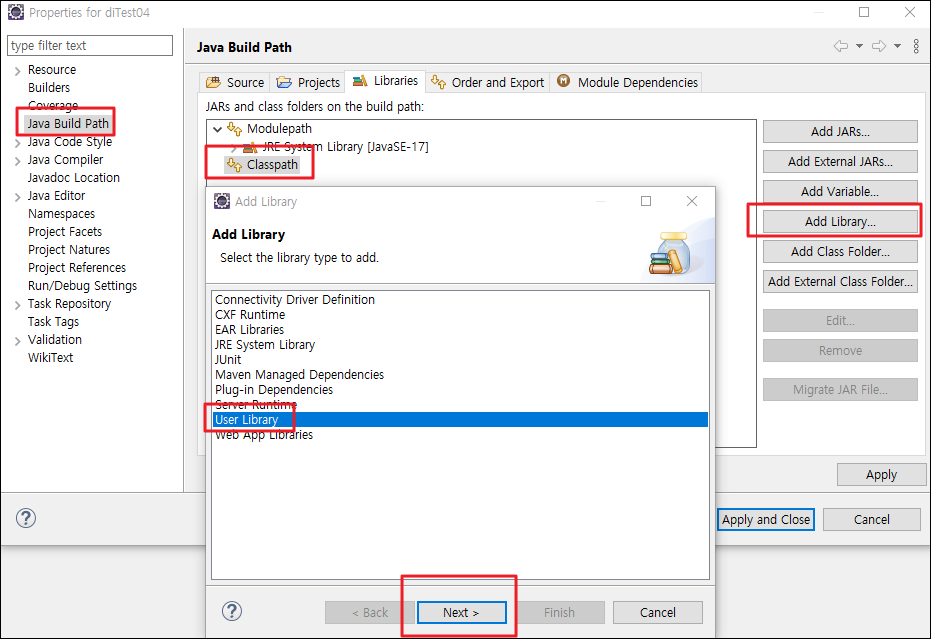
User Library 만들기
Wizard - Java Build Path - Libraries - ClassPath - Add Library - User Library - Next - User Libraries - New - 라이브러리폴더 이름 입력 - Add External JARs... - jar 선택 - Apply

반응형
댓글