태그, input type
<datalist>
<datalist id="">
<option value="">
<option value="">
....
....
</datalist>
		나라 : <input type="text" list="countries" name="countries"><br>
		<datalist id="countries">
			<option value="가나">
			<option value="스위스">
			<option value="브라질">
		</datalist>
버튼만들기 (input, button)
		<input type="submit" value="확인1"> <br>
		<button type="submit"> 확인2</button> <br>
		<button> 확인3</button>
체크박스 CheckBox
- JSP에서 받을 때 배열로 받아야 함(중복선택이 가능하기 때문에)
getParameterValues("name") 사용 - checked 옵션으로 기본 값 체크 가능
<input type="checkbox" name="1" value="음식1" checked="checked">
<input type="checkbox" name="1" value=음식2" checked="checked">
<input type="checkbox" name="1" value="음식3" checked="checked">
<input type="checkbox" name="2" value="장난감1">
<input type="checkbox" name="2" value="장난감2">
<input type="checkbox" name="2" value="장난감3">
1. HTML 예시
		이름: <input type="text" name="name"><br>
		짜장면 <input type="checkbox" name="food" value="짜장면">
		짬뽕 <input type="checkbox" name="food" value="짬뽕">
		탕수육 <input type="checkbox" name="food" value="탕수육">
		<br>
2. JSP에서 받을 때 예시 (getParameterValues)
String []food = request.getParameterValues("food");라디오박스 Radio
- 다중 선택 불가능(체크박스 비슷)
콤보박스 select
- seleted 옵션 = 초기 기본 선택 옵션
- size 옵션 = 초기부터 리스트 형태로 나타남(size=2이상 주면 리스트로 나타남)
- multiple =여러개 동시 선택 가능(ctrl 버튼 누른 후)
label
- 캡션과 폼요소를 하나로 묶음
- HTML5 권장사항
- for - 누구를 위한 label인지 표현
	<!-- 1번 표현(비권장)  -->
	사용자 ID: <input type="text"><br>

	<!-- 2번 표현(권장)  -->
	<label> 사용자 ID: <input type="text"></label>

	<!-- 3번 표현(권장)  -->
	<label for="id">사용자 ID:</label>
	<input type="text" id="id" name ="id">
색코드 - #rrggbb
- 8비트 범위(0~255)로 16진수 00~ff로 표기
** onchange = 색이 바뀌는 이벤트 발생 시
<input type="color" value="#00BFFF"
onchange="document.body.style.color=this.value">
		<input type="color" value="#ff0000"
			onchange="document.body.style.color=this.value">
시간정보
- jsp에서 사용할 때 배열로 받는 것 아님 (참고)
	<form>
		month:<input type="month"> <br>

		week:<input type="week"> <br>

		date:<input type="date"> <br>

		time:<input type="time"> <br>

		local:<input type="datetime-local"> <br>
	</form>
1. month : 년/월

2. week : 년/주 (몇번째 주 인지)

3. date : 년/월/일

4. time : 시/분

5. datetime-local : 년/월/일/시/분

스핀버튼
<input type="number" min="" max="" step="증가시킬 값">
<input type="number" min="0.0" max="10.0" step="0.5">
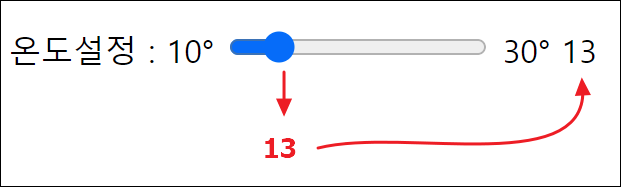
슬라이드 바
- --- ° --- '온도'를 의미
<input type="range" min="" max="" list="">
'oninput' 을 이용하여 슬라이드 바 값 변동 확인 가능.
자바스크립트로 온도 조절할 때마다 숫자 값 변동되게 설정
방법1 - HTML input 타입 안에 바로 oninput 작성
<form action ="">
지속시간 (0.0~10.0시간)
<input type="number" min="0.0" max="10.0" step="0.5"><br><br>
온도설정 : 10°
<input type="range" min="10.0" max ="30.0" list="temperatures"
oninput="document.getElementById('temp').innerHTML=this.value"
> 30°
<span id="temp"></span>
<datalist id="temperatures">
<option value="12" label="Low">
<option value="20" label="Medium">
<option value="28" label="High">
</datalist>
</form>방법2 - HTML에서 <script>로 구분하여 작성
<script type="text/javascript">
function inputTest(n){
document.getElementById("temp").innerHTML=n;
}
</script>
<form action ="">
지속시간 (0.0~10.0시간)
<input type="number" min="0.0" max="10.0" step="0.5"><br><br>
온도설정 : 10°
<input type="range" min="10.0" max ="30.0" list="temperatures"
oninput="inputTest(this.value)"
> 30°
<span id="temp"></span>
<datalist id="temperatures">
<option value="12" label="Low">
<option value="20" label="Medium">
<option value="28" label="High">
</datalist>
</form>방법3 - 자바스크립트 파일로 따로 분리하여 실행
 	let inside = document.getElementById("inside");
 	function inputTest(){

 		const temp = document.getElementById("temp");
 		temp.innerHTML = inside.value;
 		console.log(temp);
 	}
 	inside.addEventListener("input", inputTest);
<input type="email" / "url" / "tel" >
	<form action="emailResult.jsp" method="post">
		이름 : <input type="text" name="name" required><br>
		나이 : <input type="number" name="age" required><br>
		이메일: <input type = "email" placeholder="id@host" required><br>
		홈페이지 : <input type="url" placeholder="http://" required><br>
		전화번호 : <input type="tel"
				placeholder="010-1234-5678"
				pattern="[0-9]{3}-[0-9]{4}-[0-9]{4}"
				required><br>

		<button> 확인 </button>
		<button type="reset"> 취소 </button>
	</form>

	<hr>
	검색어 : <input type="search" placeholder="검색어">
	<input type="button" value="검색">
<fieldset>
- <form> 요소에서 연관된 요소들을 하나의 그룹으로 묶을 때 사용
	<form action="">
		<fieldset>
			<legend> 회원정보</legend>
			이메일:<input type="email"> <br>
			홈페이지 : <input type="url"><br>
			전화번호 : <input type="tel"><br>
		</fieldset>

		<small> 질문: tel)010-111-1111</small>
	</form>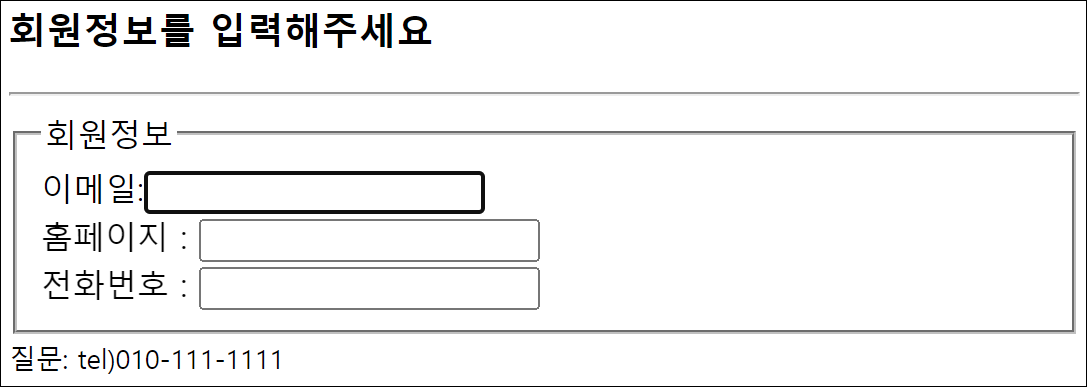
CSS (Cascading Style Sheet)
선택자 { 프로퍼티 : 값 ; 프로퍼티 : 값 .... ..... ....}
--- 예시 ---
<style>
p {
color:red;
font-size:25px;
}
</style>
    <style>
        p{
            color:red;
            font-size:25px;
        }

    </style>
스타일 시트 파일 불러오는 방법 2가지
1. 첫번째 방법
<link href="css명" type="text/css" rel="stylesheet">
2. 두번째 방법
<style>
@import url(css명);
<style>
    <style>
        @import url(myStyle.css);
    </style>
인라인 스타일
- 태그 안에 직접 스타일을 작성
<태그명 style="속성:값">
<p style="color:blue">css에서 # 과 .(dot)
- # - id를 선택할 때 사용
- . (dot) - class를 선택할 때 사용
	#title, li{
    	color:brown;
    }
    .addr{
    	color:blue;
    }
TIP
- 태그에서 name 설정 - 서버에서 필요한 name
- 태그에서 id 설정 - 자바스크립트에서 필요한 id
반응형
'개발 > 교육' 카테고리의 다른 글
| (JSP) 34일차 (0) | 2022.05.18 |
|---|---|
| (HTML, CSS ) 32일차 (0) | 2022.05.12 |
| (HTML, CSS ) 30일차 (0) | 2022.05.10 |
| (HTML, CSS ) 29일차 (0) | 2022.05.09 |
| (데이터베이스) 27일차 (0) | 2022.05.03 |


댓글